Kill Wi-Fi dead zones and recycle an old router with a DIY wireless network extender to get whole-house Wi-Fi.
Unless you're in a small house or apartment, chances are there's a corner of your home that your standalone router doesn't quite reach. Whether it manifests as spotty Wi-Fi or just an irritatingly slow connection, you can do something about it besides complain about your disrupted Netflix session. By turning an old router into a Wi-Fi extender, you can grab the Wi-Fi data signal out of thin air and retransmit it to other parts of the house.
A virtual router can share your VPN connections with other devices
(Image credit: Shutterstock/Casezy idea)
It's easy to reconfigure an old router into an extender so that the device grabs a strong Wi-Fi signal and sends out a fresh stream of data to previously unconnected areas. While it costs next to nothing to do this, don't expect Wi-Fi miracles. Still, it's a good way to inexpensively fill your home with wireless data.
We transformed a dusty Netgear R7000 802.11ac router into a repeater as an example of how to do this trick. Using Netgear Genie, a free network-management app for Netgear routers, we easily converted the old router into a Wi-Fi extender to add Wi-Fi to a guest room in my basement.
The general process for other routers is similar but not exactly the same. If you don't have one or something similar (like an R6700 or R6900), you can get a used one for about $20 online.
1. Find a Compatible Router
If you have an old router sitting around, check with the manual to make sure the device can be converted into an extender or a repeater, and get specific instructions. If the router doesn't support running as a repeater or an extender using the manufacturer's firmware, there's another way. See if the router can use open-source firmware (like DD-WRT). If so, chances are that you can indeed use your old router as an extender.
Be careful with routers from the 802.11b and g eras; they won't work well, because they have a lower maximum bandwidth, which creates bottlenecks in your network. Do the math: If you have a 100-Mbps connection and the extender is limited to a peak of 11 or 54 Mbps, you'll likely be wasting most of your bandwidth with an older router. Only an 802.11n or ac router will do.
Finally, Asus AiMesh routers can link together to create a mesh network on their own. There are 17 Asus routers that support the AiMesh tool and can automatically create a mesh network topology to fill a home with wireless data. You will need to load new firmware to make it work, though.
2. Update Firmware and Reset Preferences
After getting and installing the R7000's latest firmware and connecting the router to our network with a Cat5 jumper cable, we opened a browser window and typed, "www.rouoterlogin.net" to open the login screen. Other router makes will have different addresses or will have actual IP addresses, like 192.168.1.1. See the chart below to find out the details for your brand of router.
Brand
IP Address
URL
Asus
192.168.1.1
http://router.asus.com
Belkin
192.168.2.1
http://router
D-Link
192.168.0.1
http://mydlinkrouter.local
Linksys
192.168.1.1
http://myrouter.local
Netgear
192.168.0.1
http://www.routerlogin.net
TP-Link
192.168.1.1
http://tplinklogin.net or http://tplinkwifi.net
The default for many Netgear routers is admin/password, but others use different combinations, the most common passwords being admin, default, 1234 and password. If these default passwords don't work, you can generally find the correct ones through the manufacturer's product-support pages or on sites like RouterPasswords.com and Router-Reset.com.
Needless to say, you should change your password as soon as you can to something more secure (and we have a handy guide that walks you through the process). If you've set a new password for the router and since forgotten it, go right ahead and perform a hard restart that will wipe all existing data from the system. You typically do this by holding the reset button down for 20 or 30 seconds and then the router will restart.
We used Netgear's Genie software, which is built into the R7000 router, to change the configuration. Once logged in, go to the Wireless section of the main configuration page. Then, open Advanced Setup and Wireless Repeating at the bottom. Start with the 2.4GHz section on top and make sure that the network name and password match the rest of the network to ensure reliable roaming from router to extender. Next, click or tap on Enable Wireless Repeating Function and then on Wireless Repeater.
3. Set a Static Address
It's a little tricky, but next, you need to type in a static IP address for the repeater. I like to use 192.168.1.2 (one higher than the base router's address) to denote that it's part of the LAN's infrastructure and not a client or printer. I keep a handwritten list of static addresses taped to the router to prevent later confusion over IP addresses.
Nearly done. Make sure that the subnet mask matches the router's – the subnet mask is what the router uses to determine if the network segment and client are local or remote. This information can generally be found in the router’s management software, on the same screen as the IP address you just set. The most common default subnet mask is 255.255.255.0, and there’s no reason to change it.
Before you're done, check off the box for Disable Wireless Client Association and enter the router's MAC address; it's generally on a sticker on the back or underside of the router, or included with the device documentation.
4. Repeat for 5GHz
The R7000 is a dual-band router, so go down to the 5GHz section and repeat the previous set of instructions. When you're done, click on Apply. The router should reboot and, in a couple of minutes, behave like a wireless extender.
5. Check Your Work
It's time to set up your extender. Pick a place with an AC outlet that is about halfway between the network's router and the area you want to fill with Wi-Fi. There are plenty of specifics to worry about when finding the best spot for your router, but you're basically looking for the sweet spot where you get the best readings.
Start up the extender, and with a notebook, phone or tablet, try to get online. Follow this up with a Speedtest.net check on your available bandwidth. It'll take some trial, a lot of error and maybe an extension cord if an AC outlet isn't in the exact right place.
For me, it took about 15 minutes and four tries to get a good location: about 60 feet from the basement's router, which allowed the R7000 extender to bathe the guest room in Wi-Fi. The results speak for themselves. Using Speedtest.net as a benchmark, here are our results:
How to Remove Background Noise and Echo in Audacity 2021 (New Effects)
Before we proceed, make sure that you have Audacity downloaded and installed on your computer. If not, you can always download itfrom the official website
Filmmaker’s need to remove background noise is very common. Whether it’s for a short film, feature film or an interview, removing background noise as an indie filmmaker is usually left to yourself or the editor. In larger-scale Hollywood budget films there are specialists on board to do this; but fear not, there are easy-to-use platforms out there that simplify the process, and make the outcome crisp.
The platform we’re focusing on today is Audacity. Audacity is an open-source sound editing platform which is free to use, easy to navigate and has consistent updates, making it one of the main audio editing programs used by content creators. Audacity’s minimalistic build is key to sound editing, it’s very simple and allows you to focus on the processes. Here we breakdown how to remove background noise in Audacity.
Removing background noise in Audacity
1. To remove the noise first download Audacity, you can download Audacity here.Once you have downloaded Audacity create a new file then click File > Import and select the recording you are looking to reduce the background noise on.
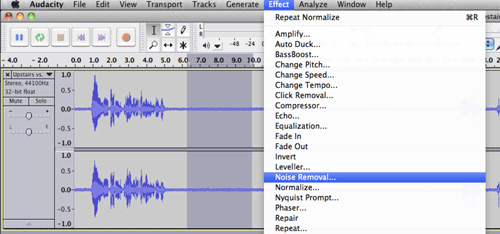
2. Select the silent part of your audio clip so it’s just noise.
3. Go to the effects menu and scroll down to the noise removal tab and click.
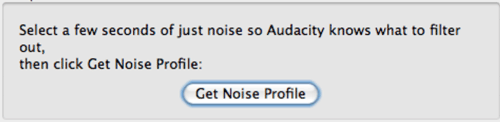
4. You will then get a pop up asking you to “Get noise profile”. This allows Audacity to know what to filter out. It basically picks up what is seen as background noise, so it has a profile on what background noise to remove from your sound file.
5. Now select and highlight all the audio you wish to remove the background noise from, go to the effects menu and select noise removal in the menu.
6. Adjust the settings to suit, once you’re happy with your settings click ok.
7. Finally, listen over your audio and ensure it sounds correct. Once you are happy with the audio you can export. To export your clip click: File > Export and select the file type. You can export to MP3 or WAV in the export dropdown menu but there are other export types if you click File > Export > Export Audio. Once you have adjusted the settings click ok to export.
We hope you enjoyed this article on how to remove background noise audacity, check out our other blogs.
How Do You Remove Echo in Audacity?
Before we proceed, make sure that you have Audacity downloaded and installed on your computer. If not, you can always download it from the official website.
Also, note that this process is very complex and requires a high understanding of how sound recording works. Otherwise, you’ll just have to make do and experiment with all the features until you’re satisfied with the result.
With that in mind, let’s take a look at how you can remove echo in Audacity with and without a plug-in.
Reducing Echo Without a Plug-In
After downloading and starting Audacity, follow these steps:
Click File at the top of the screen.
Select Open.
A window will appear. At the bottom of the window, change Files of type to All supported types.
Click on the file you want to edit, then click Open.
Select the segment of the audio file you’d like to edit. You can do this by clicking on one end of the segment and dragging the mouse until you reach the other. If you want to edit the whole file, press Ctrl+A on Windows or Command+A on Mac.
Open the Effect menu at the top of the screen.
Select Noise Reduction.
Increasing the Noise reduction slider should greatly improve audio quality.
If turning up noise reduction decreases the volume, go to the effects menu and choose Amplify to increase the volume.
Find the compressor in the Effects menu. The main thing you should do is change up the ratio, but you can also change up the noise floor and threshold if necessary.
Depending on your current sound pitch inside of the file, you might need to use a low pass or a high pass filter. They are located in the bottom half of the Effects menu. A low pass filter helps if your audio is too high-pitched, while a high pass filter comes in handy if the audio sounds too low or too muffled. Stick to changing just the Rolloff.
Find the Equalization effect and switch from Draw Curves to Graphic EQ. You may find the latter simpler to use because it gives you control over the sliders and lets you set their values that way, while the former forces you to draw the equalizer yourself. If you need to fix up your low tones, focus on the sliders to the left. The middle bars affect the mid-tones, while the bars on the right should be altered to affect the higher tones.
Proceed by clicking the File menu on top of the screen and going to Export Audio.
Choose the file type in the Save as type menu. The best-known ones are mp3 (compressed) and wav (lossless). Make sure that you don’t accidentally overwrite the old file.
Go to File and select Save Project As to save the project file.
Reducing Echo with a Plug-In
There are lots of free Plug-ins for Audacity, but for this particular issue, Noise Gate is the one you need, as it helps improve the sound quality and can help reduce the echo.
If you want to edit the whole file, press Ctrl+A on Windows or Command+A on Mac.Then
> Go to Effects > Select Noise Gate (At Bottom).
To reduce the echo, start with an “Attack/Decay” of 75, “Gate threshold” of -30, and a “Level reduction” of -100. Use these settings as a starting point. If the echo doesn’t change, increase the Gate threshold until the echo is reduced. If important audio gets cut, reduce it.
What’s most important is that you set the gate threshold. After you do that, tweak the level reduction and attack/decay settings until you’re satisfied with the result.
Final Thoughts
It’s impossible to completely remove the echo, but it isn’t impossible to reduce it. This is a quite difficult process, but if you’re skilled or persistent enough, you might find the results satisfactory. Just keep in mind that this requires lots of playing around with all kinds of different values and effects because different recording settings require different approach methods.
Were you successful in reducing the echo of your audio file? Which method did you find more helpful? Let us know in the comments below.
HOW TO INSTALL WINDOWS 10 AFTER A PC BUILD On YOUR OWN | 1 March 2021
Welcome to the fifth article in the “Build Your Own PC” series, powered by AMD Ryzen and Radeon. In this article, we’re going to be installing Windows 10 and all the drivers for your PC. We’ll look at the typical installation scenario that you’re going to face after building your PC for the first time and we’ll take you through all the steps needed to set up your machine properly.
CREATING THE INSTALLATION MEDIA DISK
We’ll be installing Windows 10 using a bootable USB drive. In order to prepare a USB drive with the installation media you need an existing PC with Windows or Linux running on it. You can always make a bootable USB drive at your friend’s or neighbour’s place if you don’t have a second PC lying around.
You will need an 8GB USB flash drive for this process. Plug your USB flash drive into your friend’s computer and google for Windows Media Creation Tool. You’ll end up on the Microsoft Web Page that allows you to download the tool. Scroll to the section that reads “Create Windows 10 installation media” and click on the “Download tool now” button. You will initiate the download of the latest version of the tool. Run the tool and it’ll connect to the internet to get the latest details from Microsoft’s servers. You’ll be presented with the License Agreement first, read through it if you wish to and then Accept the Agreement.
The next screen will give you a choice between upgrading the current PC to the latest Windows 10 version or you can create an installation media. Choose the latter option and click next. On the next page, you will be given the choice to select the language, edition and architecture of the installation file. We tend to go with English (US) of the Windows 10 Edition for the 64-bit Architecture. Click next.
On the next screen you will be presented with the option of either preparing a USB drive or downloading the ISO separately. Ensure you have the USB Flash drive connected and then select the USB Flash drive option in the Windows 10 Media Creation Tool window. Click on Next.
This screen allows you to select the USB Flash drive on which the Installation Media will be set up. Please note that the contents of this USB Flash drive will be deleted when you proceed to the next screen so please choose the correct USB drive. If you have any other USB drives connected, it’s better to detach them before moving to the next screen. Click Next.
The tool will now download the latest Windows 10 setup from Microsoft’s servers and copy it to your USB flash drive. It will also make the USB drive bootable which is necessary for you to install Windows using the Flash Drive. Once the process is completed, you can remove the flash drive and plug it into your newly assembled desktop PC.
WINDOWS 10 INSTALLATION
We’re assuming that your PC boots into BIOS just fine after you’ve followed the steps from the previous article. All current gen motherboards will have the appropriate options selected by default in the BIOS. But it’s always a good thing to go check these aspects anyway. Enter your BIOS by tapping on the DELETE key immediately after switching on your PC.
Once in the BIOS, head to the Storage section to see that all your SATA / NVMe slots are set to use AHCI. The other thing to check is Boot Priority i.e. the sequence in which your computer boots through the different storage options on your PC. This means every single SSD, hard drive and network will be checked to see where the operating system lies and it will boot the OS which is the highest on the list of boot priority. By default, the SSD and Hard drives are given first priority and then comes the USB drives and then come the network drives. If everything seems normal up till now. You can exit BIOS after saving all your settings by pressing F10.
Your PC will boot once or twice and then hunt for the operating system. Since there is none installed, it will move to the USB drive with the Windows 10 installation media since that’s the only bootable drive connected to your PC at the moment. This will automatically initiate the Windows 10 setup. If nothing happens, reboot your PC and tap on the “select boot drive” or “boot menu” shortcut key. This varies from manufacturer to manufacturer and for MSI it is F11. You should refer to the motherboard manual to figure out the boot menu shortcut key for your system. It is usually, F11, F6 or F2. Once you enter the boot menu, select “UEFI: USB XXXX” option. There will be two USB options, always pick the UEFI one.
Things have become monumentally simpler over the last decade and installing an OS is an extremely simple process now.
The Windows 10 setup has now begun and you’re facing the first screen of Windows installation. Click on Install now to proceed.
The next screen will ask you to enter the Windows 10 product key, if you have purchased a product key, now is the time to enter it. If not, you can always perform this step after Windows 10 is installed. Click on “I don’t have a product key” for now.
The next screen allows you to pick the Windows 10 Version. The versions with N at the end have some software removed for legal reasons. There are basically 3 major versions - Home, Education and Pro. The pricing for these is different with Home being cheap and Pro being the most expensive of the lot, so when you purchase a key later on, remember what you picked. Click next.
In the next window, select “Custom: Install Windows Only”. Since you don’t have Windows installed already, the upgrade option is moot.
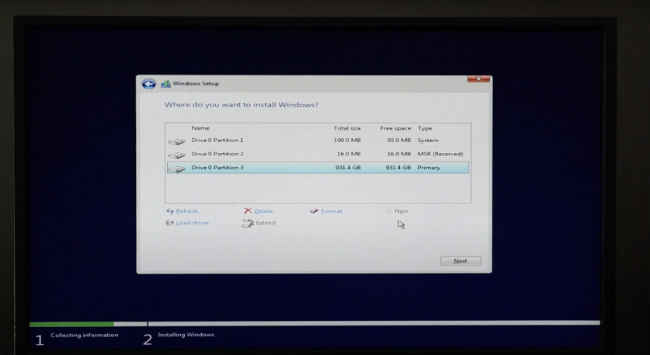
In the next window, you will be presented with all the disk drives that can be used for Windows 10 installation. You want to install Windows on the fastest drive you have connected, so it’ll be the NVMe SSD, followed by SATA SSD and last would be a hard drive. The storage drives are arranged in sequence with labels that read Drive 0, Drive 1, Drive 2 and so on. Identify the fastest drive based on the capacity. Select it and tap on “New”. Since your hard drives are new and have never been used in a PC, you will have to create a new partition using the “New” option. Ideally, you should just see just one entry “Drive 0 Unallocated Space” or two, if you have two storage drives connected. Enter the capacity and proceed. For the OS, we recommend using about 240 GB or so. If your SSD is 240/250/256 GB, then use all of it. If you find any existing partitions on your storage drive, then delete those and create a new partition using the “New” option.
Once you have created a new partition, select it and proceed. Windows will create a few additional partitions for recovery purposes, let these remain and pick the largest of these partitions and proceed. Windows will now start the setup and start copying all the files. Your PC will automatically reboot after this process is done and setup will continue after the PC reboots.
You DO NOT have to select the boot menu option again since Windows will take care of it. Your PC is now booting from your SSD or Hard drive since all the necessary files have been copies to your SSD or Hard drive.
The next screen will be the “Basics” window which starts with selecting the Region in which you are based. Pick India.
Next is your keyboard layout. Pick US since most keyboards sold in India follow the US layout. You can add additional keyboard layouts when you press next. We’ll skip this step.
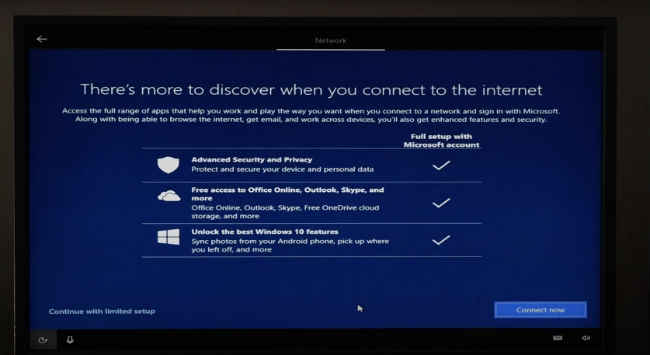
Next is the Network screen. If you have an Ethernet cable plugged in, your setup process will skip this screen, if you rely on Wi-Fi, you can choose to connect to the Wi-Fi access point at this juncture. We prefer to not do this during the setup process since Windows tries to download additional files during the setup and if your network speed is slow, it will cause your setup to go on for a really long time.
After the network screen comes the account Screen. Enter the name of the person or organisation that will be using your new PC and click on next. You can add a password on this screen or proceed to the next step.
The next screen is Cortana, you can allow Cortana to collect your personal information to provide more personalised experience or you can go with the vanilla option. We prefer to keep to not get a personalised experience, so we tend to select No, but you can choose Yes if that’s what you would prefer..
The next screen is also about your privacy. We prefer to disable all the options. Click on next.
Your OS setup will take a few more minutes and reboot. You have now finished installing Windows 10 on your PC.
CONNECT TO YOUR NETWORK
Now that Windows 10 is all properly installed, you can plug in your ethernet cable to get access to the Internet or connect to Wi-Fi if your motherboard has that option. Please note, if you connect the PC to the internet at this stage, it will automatically start downloading drivers from Microsoft’s servers.
Most hardware vendors work with Microsoft to seed their drivers automatically via the Windows Update service. You can even trigger Windows Update by Clicking on the Start menu and typing Windows Update, and selecting the service.
Check for updates and Windows will download the latest security updates and drivers for your PC. Often the drivers stored on Microsoft’s servers might not be the latest. In order to get the latest, please refer to the motherboard’s support page. On the motherboard’s support page, select the OS as Windows 10 64bit and it will show all the drivers available for your PC. Download the Chipset, Network, VGA and Audio drivers.
The VGA drivers are only needed if you are using an AMD APU. If you’re using a discrete graphics card then get the drivers from your graphics card manufacturer’s website.
Install the drivers in the following sequence. First the Chipset or System drivers, followed by the LAN drivers and then you can go with the Audio, VGA and Storage drivers. Windows will automatically install the LAN, Audio and Storage drivers during the setup so you’re only upgrading those to the latest drivers. If at any stage, if any of the driver setups ask to reboot the system, please do so before proceeding to the installation of the next driver. Some drivers are only partially installed before the restart and the restart process completes the installation. It’s best to let one thing completely install before moving to the next driver.
The last thing you should do is to check the device manager to see if everything is installed or not. Click on the start menu and type out Device Manager and open it. In the Device Manager we’ll scroll through the enter list of hardware connected to see if there are any “Yellow Exclamation marks”. These indicate any devices that aren’t installed. You’ll usually find these under “Other Devices” and they’ll be labelled “Unknown device”. If there are none, you’re good to go! Your PC is properly set up.
CONCLUSION
Congratulations, you’ve installed Windows and all the required drivers. Your PC is now properly set up. This concludes the fifth article in a 7-part series on how you can build your own desktop PC. If you’ve faced any issues along the way, the next two videos should help you fix them. Remember to tag us in your PC build posts on Instagram and Twitter. Check out the links below to view the rest of the articles in our ‘Built Your Own PC’ series.