Saturday, March 13, 2021

How to Remove Background Noise and Echo in Audacity 2021 (New Effects)

 How to Remove Background Noise and Echo in Audacity 2021 (New Effects)

Before we proceed, make sure that you have Audacity downloaded and installed on your computer. If not, you can always download it from the official website

Filmmaker’s need to remove background noise is very common. Whether it’s for a short film, feature film or an interview, removing background noise as an indie filmmaker is usually left to yourself or the editor. In larger-scale Hollywood budget films there are specialists on board to do this; but fear not, there are easy-to-use platforms out there that simplify the process, and make the outcome crisp.

The platform we’re focusing on today is Audacity. Audacity is an open-source sound editing platform which is free to use, easy to navigate and has consistent updates, making it one of the main audio editing programs used by content creators. Audacity’s minimalistic build is key to sound editing, it’s very simple and allows you to focus on the processes. Here we breakdown how to remove background noise in Audacity.

Removing background noise in Audacity

1. To remove the noise first download Audacity, you can download Audacity here. Once you have downloaded Audacity create a new file then click File > Import and select the recording you are looking to reduce the background noise on.

2. Select the silent part of your audio clip so it’s just noise.

3. Go to the effects menu and scroll down to the noise removal tab and click.

4. You will then get a pop up asking you to “Get noise profile”. This allows Audacity to know what to filter out. It basically picks up what is seen as background noise, so it has a profile on what background noise to remove from your sound file.

5. Now select and highlight all the audio you wish to remove the background noise from, go to the effects menu and select noise removal in the menu.

6. Adjust the settings to suit, once you’re happy with your settings click ok.


7. Finally, listen over your audio and ensure it sounds correct. Once you are happy with the audio you can export. To export your clip click: File > Export and select the file type. You can export to MP3 or WAV in the export dropdown menu but there are other export types if you click File > Export > Export Audio. Once you have adjusted the settings click ok to export.

We hope you enjoyed this article on how to remove background noise audacity, check out our other blogs.

How Do You Remove Echo in Audacity?

Before we proceed, make sure that you have Audacity downloaded and installed on your computer. If not, you can always download it from the official website.

Also, note that this process is very complex and requires a high understanding of how sound recording works. Otherwise, you’ll just have to make do and experiment with all the features until you’re satisfied with the result.

With that in mind, let’s take a look at how you can remove echo in Audacity with and without a plug-in.

Reducing Echo Without a Plug-In

After downloading and starting Audacity, follow these steps:

  1. Click File at the top of the screen.
  2. Select Open.
  3. A window will appear. At the bottom of the window, change Files of type to All supported types.
  4. Click on the file you want to edit, then click Open.
  5. Select the segment of the audio file you’d like to edit. You can do this by clicking on one end of the segment and dragging the mouse until you reach the other. If you want to edit the whole file, press Ctrl+A on Windows or Command+A on Mac.
  6. Open the Effect menu at the top of the screen.
  7. Select Noise Reduction.
    Noise Reduction
  8. Increasing the Noise reduction slider should greatly improve audio quality.
    Noise Reduction in Progress
  9. If turning up noise reduction decreases the volume, go to the effects menu and choose Amplify to increase the volume.
    Audacity Amplify
  10. Find the compressor in the Effects menu. The main thing you should do is change up the ratio, but you can also change up the noise floor and threshold if necessary.
  11. Depending on your current sound pitch inside of the file, you might need to use a low pass or a high pass filter. They are located in the bottom half of the Effects menu. A low pass filter helps if your audio is too high-pitched, while a high pass filter comes in handy if the audio sounds too low or too muffled. Stick to changing just the Rolloff.
    Low and High-Pass Filters
  12. Find the Equalization effect and switch from Draw Curves to Graphic EQ. You may find the latter simpler to use because it gives you control over the sliders and lets you set their values that way, while the former forces you to draw the equalizer yourself. If you need to fix up your low tones, focus on the sliders to the left. The middle bars affect the mid-tones, while the bars on the right should be altered to affect the higher tones.
    Equalization
  13. Proceed by clicking the File menu on top of the screen and going to Export Audio.
    Audacity Export Audio
  14. Choose the file type in the Save as type menu. The best-known ones are mp3 (compressed) and wav (lossless). Make sure that you don’t accidentally overwrite the old file.
  15. Go to File and select Save Project As to save the project file.

Reducing Echo with a Plug-In

There are lots of free Plug-ins for Audacity, but for this particular issue, Noise Gate is the one you need, as it helps improve the sound quality and can help reduce the echo.

If you want to edit the whole file, press Ctrl+A on Windows or Command+A on Mac.Then

  1. > Go to Effects > Select Noise Gate (At Bottom).
    Noise Gate Plug-In

To reduce the echo, start with an “Attack/Decay” of 75, “Gate threshold” of -30, and a “Level reduction” of -100. Use these settings as a starting point. If the echo doesn’t change, increase the Gate threshold until the echo is reduced. If important audio gets cut, reduce it.

What’s most important is that you set the gate threshold. After you do that, tweak the level reduction and attack/decay settings until you’re satisfied with the result.

Final Thoughts

It’s impossible to completely remove the echo, but it isn’t impossible to reduce it. This is a quite difficult process, but if you’re skilled or persistent enough, you might find the results satisfactory. Just keep in mind that this requires lots of playing around with all kinds of different values and effects because different recording settings require different approach methods.

Were you successful in reducing the echo of your audio file? Which method did you find more helpful? Let us know in the comments below.


Monday, March 1, 2021

HOW TO INSTALL WINDOWS 10 AFTER A PC BUILD On YOUR OWN | 1 March 2021

HOW TO INSTALL WINDOWS 10  AFTER A PC BUILD On YOUR OWN | 1 March 2021


Welcome to the fifth article in the “Build Your Own PC” series, powered by AMD Ryzen and Radeon. In this article, we’re going to be installing Windows 10 and all the drivers for your PC. We’ll look at the typical installation scenario that you’re going to face after building your PC for the first time and we’ll take you through all the steps needed to set up your machine properly.

CREATING THE INSTALLATION MEDIA DISK

We’ll be installing Windows 10 using a bootable USB drive. In order to prepare a USB drive with the installation media you need an existing PC with Windows or Linux running on it. You can always make a bootable USB drive at your friend’s or neighbour’s place if you don’t have a second PC lying around. 

You will need an 8GB USB flash drive for this process. Plug your USB flash drive into your friend’s computer and google for Windows Media Creation Tool. You’ll end up on the Microsoft Web Page that allows you to download the tool. Scroll to the section that reads “Create Windows 10 installation media” and click on the “Download tool now” button. You will initiate the download of the latest version of the tool. Run the tool and it’ll connect to the internet to get the latest details from Microsoft’s servers. You’ll be presented with the License Agreement first, read through it if you wish to and then Accept the Agreement. 

The next screen will give you a choice between upgrading the current PC to the latest Windows 10 version or you can create an installation media. Choose the latter option and click next. On the next page, you will be given the choice to select the language, edition and architecture of the installation file. We tend to go with English (US) of the Windows 10 Edition for the 64-bit Architecture. Click next.

On the next screen you will be presented with the option of either preparing a USB drive or downloading the ISO separately. Ensure you have the USB Flash drive connected and then select the USB Flash drive option in the Windows 10 Media Creation Tool window. Click on Next.

This screen allows you to select the USB Flash drive on which the Installation Media will be set up. Please note that the contents of this USB Flash drive will be deleted when you proceed to the next screen so please choose the correct USB drive. If you have any other USB drives connected, it’s better to detach them before moving to the next screen. Click Next.

The tool will now download the latest Windows 10 setup from Microsoft’s servers and copy it to your USB flash drive. It will also make the USB drive bootable which is necessary for you to install Windows using the Flash Drive. Once the process is completed, you can remove the flash drive and plug it into your newly assembled desktop PC.

WINDOWS 10 INSTALLATION

We’re assuming that your PC boots into BIOS just fine after you’ve followed the steps from the previous article. All current gen motherboards will have the appropriate options selected by default in the BIOS. But it’s always a good thing to go check these aspects anyway. Enter your BIOS by tapping on the DELETE key immediately after switching on your PC.

Once in the BIOS, head to the Storage section to see that all your SATA / NVMe slots are set to use AHCI. The other thing to check is Boot Priority i.e. the sequence in which your computer boots through the different storage options on your PC. This means every single SSD, hard drive and network will be checked to see where the operating system lies and it will boot the OS which is the highest on the list of boot priority. By default, the SSD and Hard drives are given first priority and then comes the USB drives and then come the network drives. If everything seems normal up till now. You can exit BIOS after saving all your settings by pressing F10. 

Your PC will boot once or twice and then hunt for the operating system. Since there is none installed, it will move to the USB drive with the Windows 10 installation media since that’s the only bootable drive connected to your PC at the moment. This will automatically initiate the Windows 10 setup. If nothing happens, reboot your PC and tap on the “select boot drive” or “boot menu” shortcut key. This varies from manufacturer to manufacturer and for MSI it is F11. You should refer to the motherboard manual to figure out the boot menu shortcut key for your system. It is usually, F11, F6 or F2. Once you enter the boot menu, select “UEFI: USB XXXX” option. There will be two USB options, always pick the UEFI one.

Things have become monumentally simpler over the last decade and installing an OS is an extremely simple process now. 

The Windows 10 setup has now begun and you’re facing the first screen of Windows installation. Click on Install now to proceed.

The next screen will ask you to enter the Windows 10 product key, if you have purchased a product key, now is the time to enter it. If not, you can always perform this step after Windows 10 is installed. Click on “I don’t have a product key” for now.

The next screen allows you to pick the Windows 10 Version. The versions with N at the end have some software removed for legal reasons. There are basically 3 major versions - Home, Education and Pro. The pricing for these is different with Home being cheap and Pro being the most expensive of the lot, so when you purchase a key later on, remember what you picked. Click next. 

In the next window, select “Custom: Install Windows Only”. Since you don’t have Windows installed already, the upgrade option is moot. 

In the next window, you will be presented with all the disk drives that can be used for Windows 10 installation. You want to install Windows on the fastest drive you have connected, so it’ll be the NVMe SSD, followed by SATA SSD and last would be a hard drive. The storage drives are arranged in sequence with labels that read Drive 0, Drive 1, Drive 2 and so on. Identify the fastest drive based on the capacity. Select it and tap on “New”. Since your hard drives are new and have never been used in a PC, you will have to create a new partition using the “New” option. Ideally, you should just see just one entry “Drive 0 Unallocated Space” or two, if you have two storage drives connected. Enter the capacity and proceed. For the OS, we recommend using about 240 GB or so. If your SSD is 240/250/256 GB, then use all of it. If you find any existing partitions on your storage drive, then delete those and create a new partition using the “New” option. 

Once you have created a new partition, select it and proceed. Windows will create a few additional partitions for recovery purposes, let these remain and pick the largest of these partitions and proceed. Windows will now start the setup and start copying all the files. Your PC will automatically reboot after this process is done and setup will continue after the PC reboots.

You DO NOT have to select the boot menu option again since Windows will take care of it. Your PC is now booting from your SSD or Hard drive since all the necessary files have been copies to your SSD or Hard drive.

The next screen will be the “Basics” window which starts with selecting the Region in which you are based. Pick India. 

Next is your keyboard layout. Pick US since most keyboards sold in India follow the US layout. You can add additional keyboard layouts when you press next. We’ll skip this step. 

Next is the Network screen. If you have an Ethernet cable plugged in, your setup process will skip this screen, if you rely on Wi-Fi, you can choose to connect to the Wi-Fi access point at this juncture. We prefer to not do this during the setup process since Windows tries to download additional files during the setup and if your network speed is slow, it will cause your setup to go on for a really long time. 

After the network screen comes the account Screen. Enter the name of the person or organisation that will be using your new PC and click on next. You can add a password on this screen or proceed to the next step. 

The next screen is Cortana, you can allow Cortana to collect your personal information to provide more personalised experience or you can go with the vanilla option. We prefer to keep to not get a personalised experience, so we tend to select No, but you can choose Yes if that’s what you would prefer.. 

The next screen is also about your privacy. We prefer to disable all the options. Click on next.

Your OS setup will take a few more minutes and reboot. You have now finished installing Windows 10 on your PC. 

CONNECT TO YOUR NETWORK

Now that Windows 10 is all properly installed, you can plug in your ethernet cable to get access to the Internet or connect to Wi-Fi if your motherboard has that option. Please note, if you connect the PC to the internet at this stage, it will automatically start downloading drivers from Microsoft’s servers. 

Most hardware vendors work with Microsoft to seed their drivers automatically via the Windows Update service. You can even trigger Windows Update by Clicking on the Start menu and typing Windows Update, and selecting the service.

Check for updates and Windows will download the latest security updates and drivers for your PC. Often the drivers stored on Microsoft’s servers might not be the latest. In order to get the latest, please refer to the motherboard’s support page. On the motherboard’s support page, select the OS as Windows 10 64bit and it will show all the drivers available for your PC. Download the Chipset, Network, VGA and Audio drivers. 

The VGA drivers are only needed if you are using an AMD APU. If you’re using a discrete graphics card then get the drivers from your graphics card manufacturer’s website.

Install the drivers in the following sequence. First the Chipset or System drivers, followed by the LAN drivers and then you can go with the Audio, VGA and Storage drivers. Windows will automatically install the LAN, Audio and Storage drivers during the setup so you’re only upgrading those to the latest drivers. If at any stage, if any of the driver setups ask to reboot the system, please do so before proceeding to the installation of the next driver. Some drivers are only partially installed before the restart and the restart process completes the installation. It’s best to let one thing completely install before moving to the next driver. 

The last thing you should do is to check the device manager to see if everything is installed or not. Click on the start menu and type out Device Manager and open it. In the Device Manager we’ll scroll through the enter list of hardware connected to see if there are any “Yellow Exclamation marks”. These indicate any devices that aren’t installed. You’ll usually find these under “Other Devices” and they’ll be labelled “Unknown device”. If there are none, you’re good to go! Your PC is properly set up.

CONCLUSION

Congratulations, you’ve installed Windows and all the required drivers. Your PC is now properly set up. This concludes the fifth article in a 7-part series on how you can build your own desktop PC. If you’ve faced any issues along the way, the next two videos should help you fix them. Remember to tag us in your PC build posts on Instagram and Twitter. Check out the links below to view the rest of the articles in our ‘Built Your Own PC’ series. 


Saturday, February 27, 2021

How to Effectively Use and Add Amazon Affiliate Links to Your WordPress Website 2021

How to Effectively Use and Add Amazon Affiliate Links to Your WordPress Website 2021


If you’ve ever wanted to start a blog or website that’s monetized by the Amazon Associates program, then I have a few tips that may help you get started.

Or maybe you have a site on which you want to incorporate Amazon affiliate links most effectively.

Or you may want to know the process of inserting your links using WordPress.

I have a few ideas that will make you more money.

I started my online journey with Google Adsense, and that’s where I’ve made a lot of my money in order to quit my job.

However, after conducting a few niche site projects, and starting a few other sites on my own, I’ve learned how to use Amazon affiliate links quite well over the years.

In fact, over the past couple of months, I’ve learned some things that I never knew before, and wanted to share.

Making money through affiliate marketing in general can be quite profitable.

Promoting Amazon products (ex. by doing a product review) is perhaps one of the easiest affiliate programs to join and tends to have a great conversion rate.

Why?

Because everyone is familiar with buying from Amazon. This can result in higher affiliate commissions for you via your Amazon affiliate site.

There’s nothing more frustrating than having a problem and not being able to find an answer.

So this post will answer a few basic questions in regards to making money with the Amazon affiliate program.

I’m going to teach you how to create an Amazon affiliate account and how to use amazon affiliate links in the most effective way.

Amazon Affiliate Links: How to Insert and Add an Amazon Link

There are a couple of different ways that you can insert Amazon affiliate links on your WordPress site or other affiliate sites.

First, you can use different options provided directly by Amazon.

You can do this with any theme you’ve picked. Some WordPress themes have more ready-to-use interfaces for direct linking to Amazon.

Here’s a quick summary of the steps needed to get affiliate links directly from Amazon:

  1. Login to your Amazon Associate Account.
  2. Find the products you want to promote on Amazon and click the option you want to use in the Amazon Associates site stripe at the top of page.
  3. Copy the code for the link from the Amazon popup window.
  4. Paste this special link in a blog post, on social media, or other location on your Amazon affiliate website where you want to promote products.

Below is a more in-depth description of how to get your Amazon affiliate links — with images to guide you…

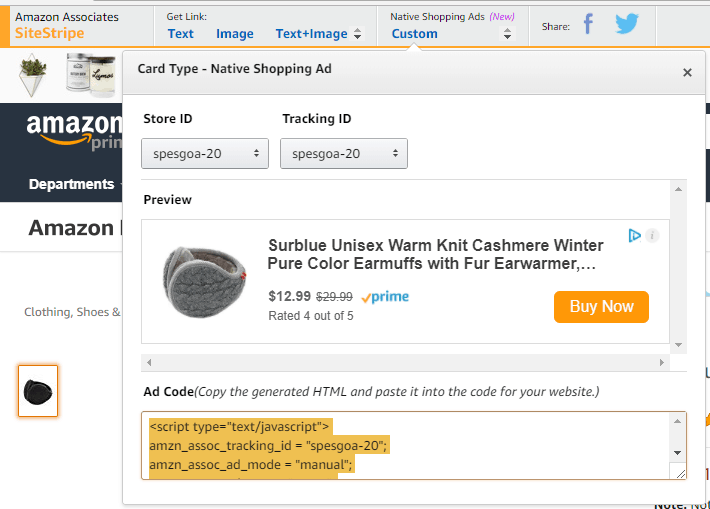
Log into your Amazon associates account and visit ANY page on Amazon.com.

Click the most appropriate option for you in the Amazon Associates SiteStripe at the top of the page. This will give you an affiliate link for that exact page.

Here’s what it looks like:


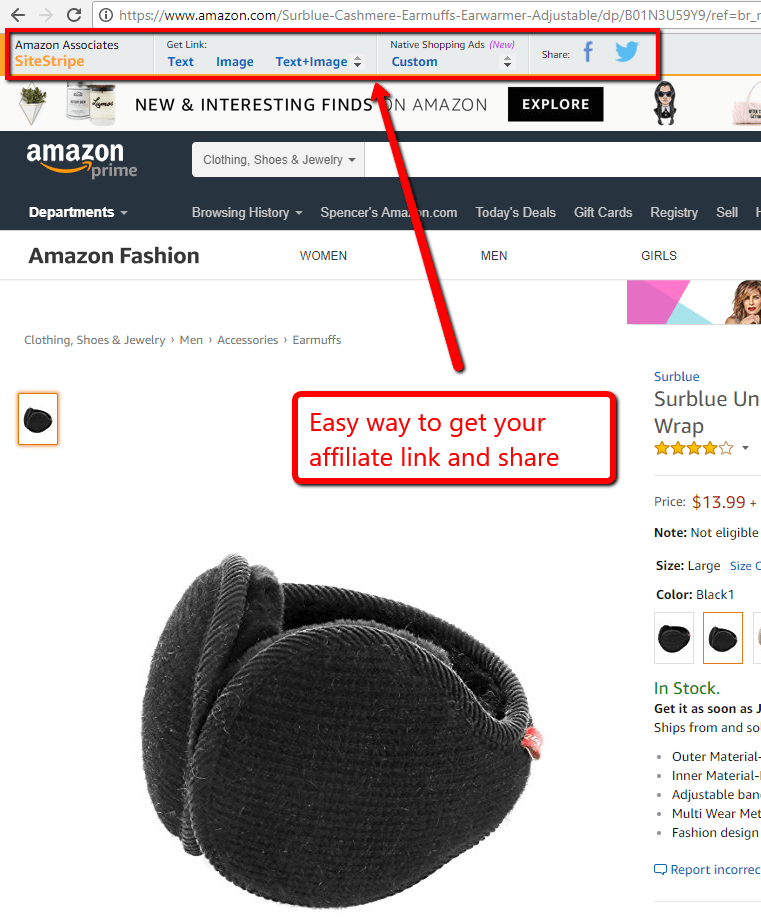
As you can see, you can click either Text, Image, Text + Image, or Custom Native Shopping Ads.

Finally, you can also share directly on Facebook or Twitter by clicking the Facebook or Twitter icons.

I typically will just select the “Text” option and then highlight just the link code itself (as shown in the image below).

Then I can use this affiliate link anywhere I want on my site (with an image, my own anchor text, on social media, or anywhere else I chose).

However, you can explore the various link options to determine what works best for you.

All you have to do is copy that link from Amazon, insert it into your website, and you’ll start seeing Amazon affiliate earnings whenever people buy products on Amazon through that link.

You can use this tool to insert links Amazon links in a WordPress site or a custom site. Either way is fine and it ends up working regardless.

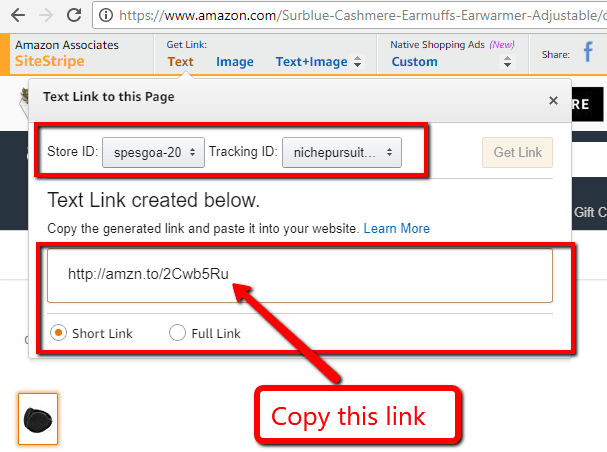
However, it’s important to note that you have the correct Store ID and tracking ID selected. Just be aware that whatever affiliate ID you select is where the affiliate commission will show up on your earnings report from Amazon.

Another pro tip is to decide if you want to use a short link or the full link (as shown in the image above). I would recommend using the full link if you EVER think you will sell your website.

I’ve purchased and sold a couple of Amazon affiliate websites, and it’s MUCH easier to find and replace (using a WordPress plugin) the old Amazon tracking ID and replace with the new one when the full link is used.

(The short link doesn’t show your tracking id, so it’s impossible to find).

Custom Options

You can also click the “Custom” link and get an embed code that includes the price, image, description, and buy button.

This makes your links more obvious, which can be a good or bad thing depending on your blog post or site that you are using it on.

You can also use several other options that are provided by Amazon directly for creating affiliate links such as inserting banners, product links, and much more.

For my own niche sites, I don’t typically use any of these other options. See the image below for a few options:

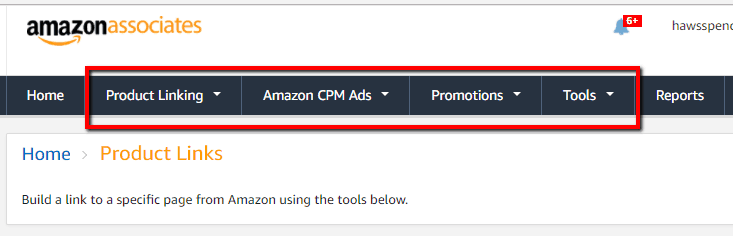
However, you should probably explore these options in your Amazon associates account to determine which type of affiliate links are the best for you to use.

You can read more about these options and get a tutorial in our Amazon Affiliate Program review. He covers some uses for all of these options in the affiliate dashboard.

Now that I’ve covered what Amazon has to offer, I want to share a couple of other tools that can assist in using Amazon affiliate links on your website.

Amalinks Pro

Amalinks Pro is the newest addition to the suite of Amazon tools, but I think it’s my favorite in the lineup.

I used it on my Niche Site Project 4 to make Amazon links fast and easy for my writers. Instead of giving you a ton of screenshots, here’s a video showing how this works:

I think the showcase boxes in particular look great, but they take an extra minute to input compared to AAWP (I review it in a second)I use Amalinks Pro for all of my call to action buttons on NSP4. Here’s a screenshot of what they look like:

amalinks pro button

All my writers have to do is change the ASIN and there’s my button.

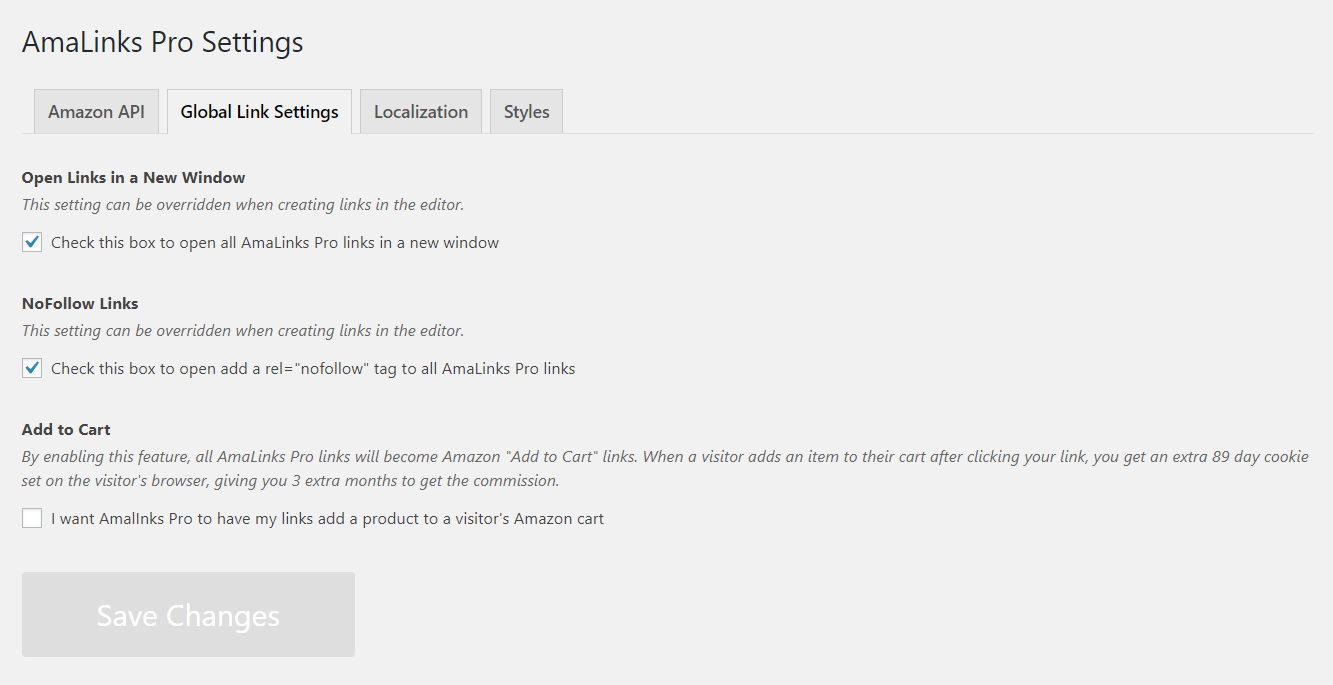
Other Settings With Amalinks Pro

Amalinks Pro also allows you to do some neat stuff with their plugin.

You can set links to open in a new tab and add nofollow to all links (you should do both of these things with affiliate links).

You can also add a setting where instead of just taking a visitor to Amazon, your links add the product to their cart.

This sounds a little invasive, but it adds an extra 89-day cookie to that visitor for you. If that buyer purchases the product within 90 days of clicking your link, you get the commission on it.

This can take a bit of the pain out of Amazon’s short cookie policy (Amazon has a notorious 24-hour cookie that doesn’t feel quite long enough).

Here’s what these settings look like in Amalinks Pro:

amalinks pro settings

I love how good Amalinks Pro looks, but I wish that adding a showcase box was a bit easier.

I wouldn’t mind some more settings like AAWP has. But overall, this is my favorite way to insert Amazon Affiliate links.

Use Amalinks Pro to create beautiful Amazon links that convert well

AAWP

Amazon Affiliate WordPress Plugin (AAWP) is another one of my newer favorites. As EasyAzon fell by the wayside, AAWP rose to take it’s place.

This is the plugin that I use for all of my showcase boxes on NSP4. I don’t like how they look as much as the Amalinks Pro ones, but these boxes are easiest for my writers.

aawp showcase box

Don’t get me wrong; I think this looks great. I just think the Amalinks Pro one looks a bit better.

But creating these showcase boxes is pretty foolproof. AAWP gives you a shortcode and all you (or your writers) have to do is change the ASIN:

aawp short code

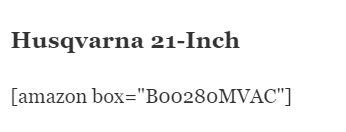
This is about as easy as it gets, so I use AAWP for my showcase boxes and Amalinks Pro for my buttons. I like to leave as little room for error as possible with my writers.

Other Settings For AAWP

AAWP has a ton of extra settings, much more so than Amalinks Pro. Some might like the extra options while others appreciate simplicity.

Here is just a small sample of what you’re able to adjust with AAWP:

aawp settings

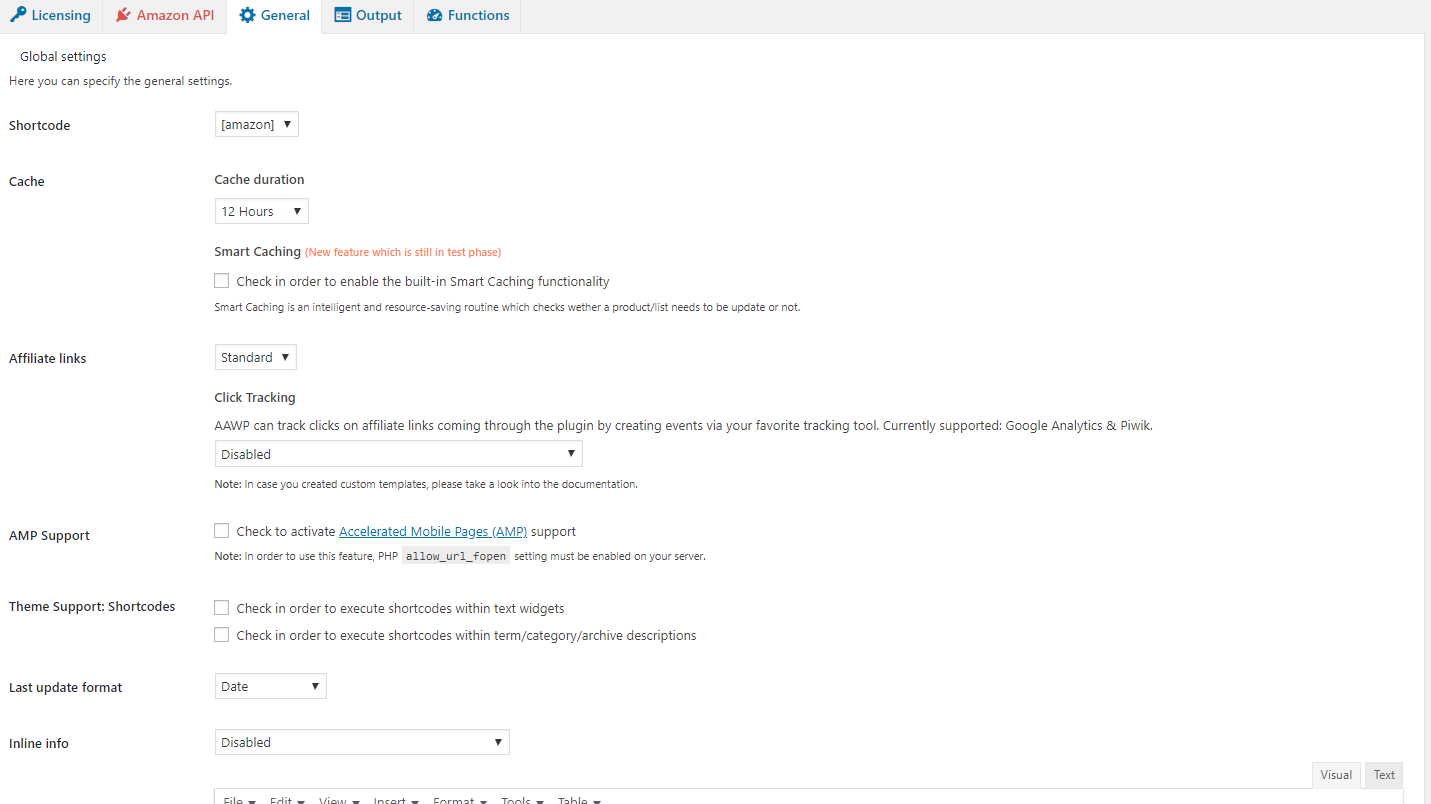
There are a couple of pages with settings like this.

You can do everything that Amalinks Pro can do (open links in new tabs, set nofollow, add to cart) and more. AAWP takes a little bit more time to set up than Amalinks Pro, but once you’re set up it’s good to go forever.

This tool is also a little less pricey than Amalinks Pro, so I like that about it.

Create easy and fast Amazon links with AAWP

Using the EasyAzon Plugin to Insert Links

Another option for how to use Amazon affiliate links on your site is to use a WordPress plugin (if using WordPress).

For many of my niche sites, I’m using the EasyAzon Pro Plugin.

The EasyAzon plugin makes it very quick and simple to insert Amazon affiliate links without ever having to leave your WordPress dashboard.

So, rather than going over to Amazon.com to find your product and then copy and paste the link, you can have the plugin do it directly for you within WordPress post or page.

Here’s an image of the EasyAzon plugin in action:

easyazonimage

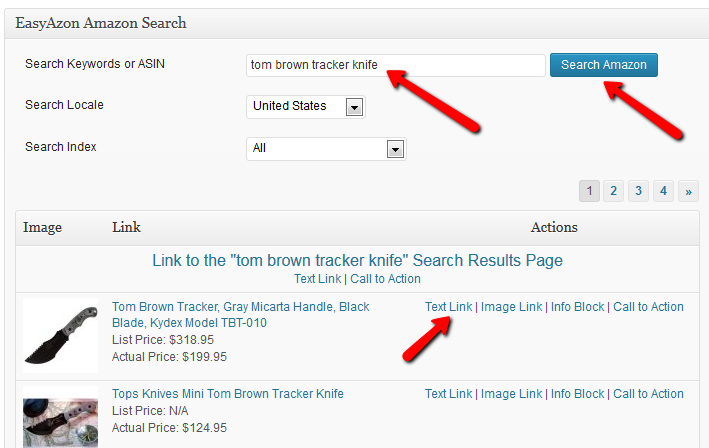
So, this is located directly below where you create a post in your WordPress text editor.

All you have to do is type in your search query (mine is “tom brown tracker knife” above), then hit search.

This will pull back all the Amazon results using the Amazon Product Advertising API, as you can see in the image.

Using the product advertising API from Amazon ensures that you stay compliant when using images, prices, and other product details.

Then simply select whether you want a text link, image link, info block, or call to action.

I went ahead and selected a “Text Link”, and here is what I get:

shortcodeeasyazon

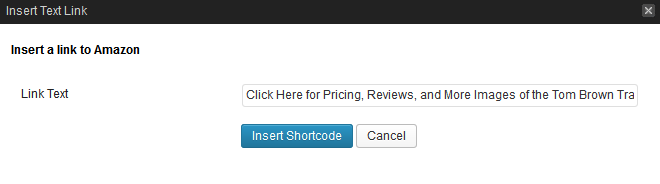
In the link text box, you can change your anchor text to whatever you want. You can see that I made it, “Click Here for Pricing, Reviews, and More…”.

Then simply clicking “Insert Shortcode” and your Amazon affiliate link is all set!

I like having a custom anchor text because it can increase clicks, which can then lead to more sales.

Other EasyAzon Settings

To first get started with EasyAzon, you will need to input your basic affiliate details.

Once you input your Amazon Associate affiliate tag, you can select whether to cloak all links, open links in a new window, make affiliate links “No Follow” and more.

Here are the options you can select:

easyazonoptions

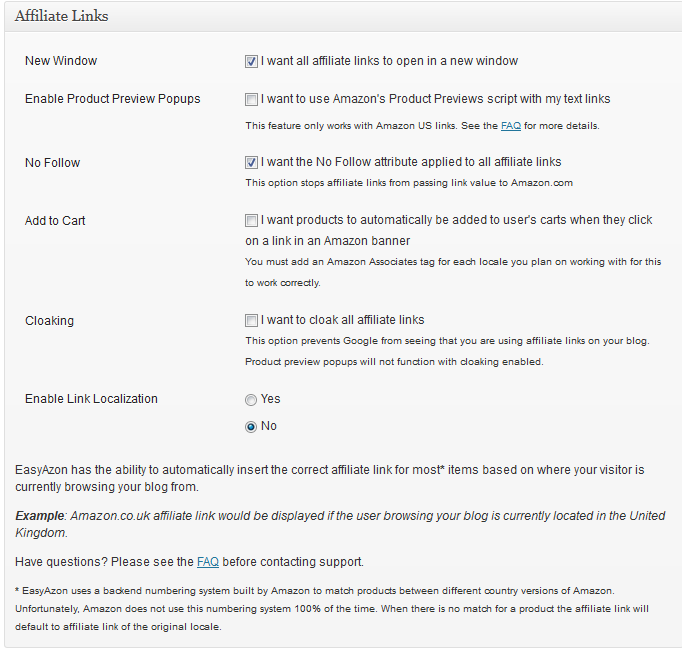
How to Get More Clicks and Sales from Your International Traffic

You will notice at the bottom of the image above that you can, “Enable Link Localization”.

Doing this detects what country the user is from that clicked your affiliate link and directs them to the correct Amazon country page.

In order to get paid when a user from the UK purchases on Amazon.co.uk for example, you MUST be approved to the Amazon.co.uk program, which is different than the Amazon.com program.

In other words, you need to apply and be approved for each of the countries for this function to work.

Well, it sounded like a lot of time and effort to apply to multiple countries; so I just figured I’d stick with the US only when I first started creating niche sites.

However, I was contacted by one of my readers who told me that it only takes a few minutes to apply to each of these programs, and that it could increase my affiliate income by over 15%!

To be honest, the only reason I hadn’t applied to the other country affiliate programs was because I thought it would be too time consuming.

I was definitely wrong about that!

I’ve now applied to Canada, UK, and others. I now use the EasyAzon plugin to automatically localize the Amazon results for each person that clicks my affiliate links and I can see that I was missing out on sales from this international traffic.

I mention this in case there is anyone out there just get started with the Amazon Associates program. This is a simple tactic that could definitely increase your overall earnings.

Genius Links

Another great tool to help you monetize traffic coming from all over the world is Geniuslink.

Genius is a SaaS based tool that can work with their WordPress plugin or any other type of website.

It also acts as a URL shortener, which is how they can track all of your link clicks, where visitors are coming from, and more.

Here’s what the dashboard looks like in my account:

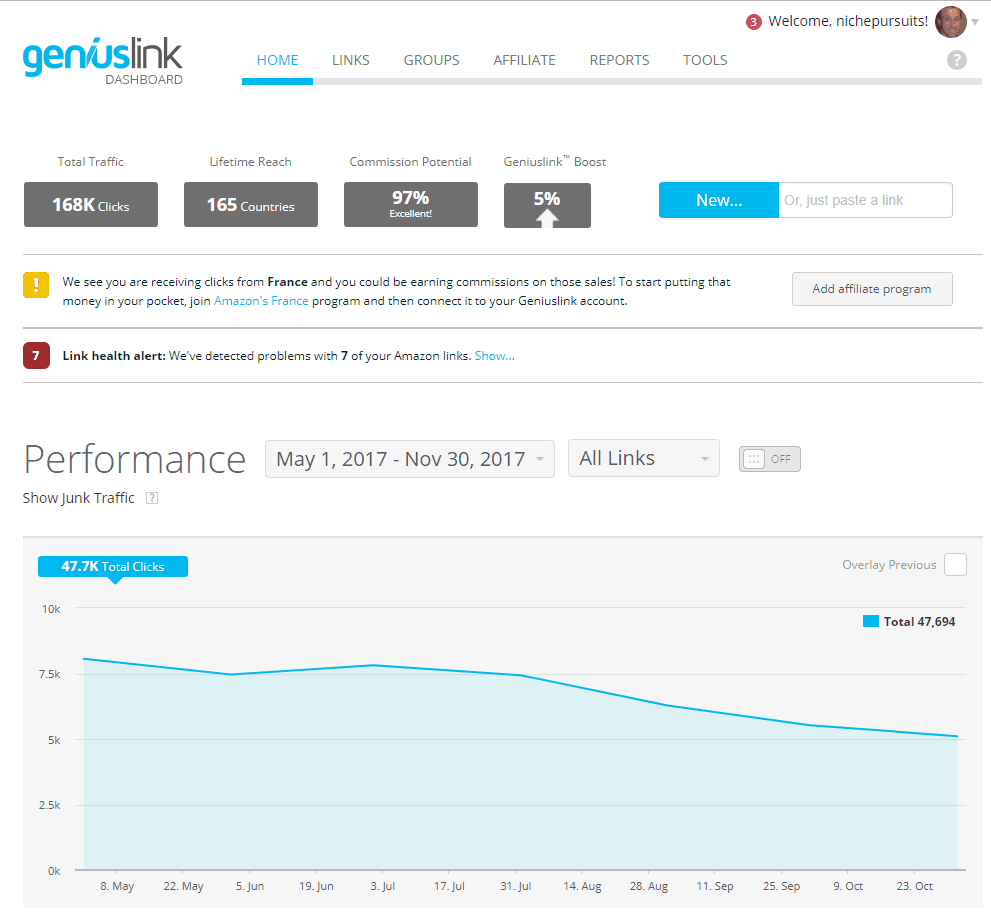
I use Genius links on a few of my niche sites and have never had any issues.

When I look at where my traffic is coming from, you can see that people from 165 countries have clicked on my Amazon affiliate links.

So, even though I’ve applied to the largest Amazon countries, I’m likely still missing out on a little bit of commission each month.

Amazon OneLink

Another option to localize your links is through a relatively new option directly through Amazon called, OneLink.

Amazon OneLink does the same thing as the EasyAzon Pro Plugin and GeniusLink.

It takes international traffic clicking on your affiliate links and sends them to the appropriate Amazon country (i.e. Amazon.co.uk, amazon.ca, etc).

To set up Amazon OneLink, just follow the directions that can be found in your Amazon associates account as shown in the image below:

Where and How to Use Amazon Affiliate Links

Now that you know step by step how to get your Amazon affiliate links, you may still have some questions about exactly where or how to use Amazon affiliate links.

In other words, how do you effectively implement your Amazon affiliate marketing strategy?

Here are some of my favorite places to use my Amazon product links…

In your blog posts as text links

This might include your WordPress blog, but could also be Tumblr blog, Blogger, Medium Blog, Weebly Blog, or any other blogging platform.

The concept of inserting your Amazon text links is essentially the same on each platform.

In your in-depth “buying guides”

Review Amazon products and insert your affiliate link.

You can see some great examples of effective use of Amazon links and in-depth buying guides at theWireCutter.com.

In your WordPress sidebar

Highlight a special offer or favorite product in your site’s sidebar.

Use Amazon native ads and banners

If you strategically place ad and/or banners within your content, you can drive traffic through your affiliate links.

Consider using the Ad Inserter WordPress plugin to have the same Amazon native ad show up at the end of each of your blog posts for example.

In product comparison tables

I recently did an in-depth tutorial of how to create product comparison charts that you might find useful.

Or if you are looking for a great software tool that automatically creates great looking Amazon product comparison tables for you, consider the software I created TableLabs.com.

On Social Media

You can do well by including affiliate links in Facebook posts, Instagram Posts, and Twitter posts.

As mentioned earlier, Amazon has no problem with you posting affiliate links on Facebook and Twitter.

In fact, they have the Facebook and Twitter linking tool built right into the Associate SiteStripe.

However, I’ve found that my own experiments with posting links on social media haven’t worked that well.

YouTube video description

If you’re building a following and review products, it’s a no-brainer to add an affiliate link in your video description.

You could even mention a pretty link or other short link in your video that people could type into their browsers.

Store pages

You can create a “store” page on your website and create your own product listings that are all just your affiliate links.

Fresh Store Builder is a tool that makes this SUPER easy and turns out great looking pages. It’ll make you look like the legit affiliate marketer you are.

Pretty Links

If you want to create your own custom affiliate link you can use a free WordPress plugin called Pretty Link.

This plugin simply makes really long links short (it’s a link shortener). I use Pretty Links all the time.

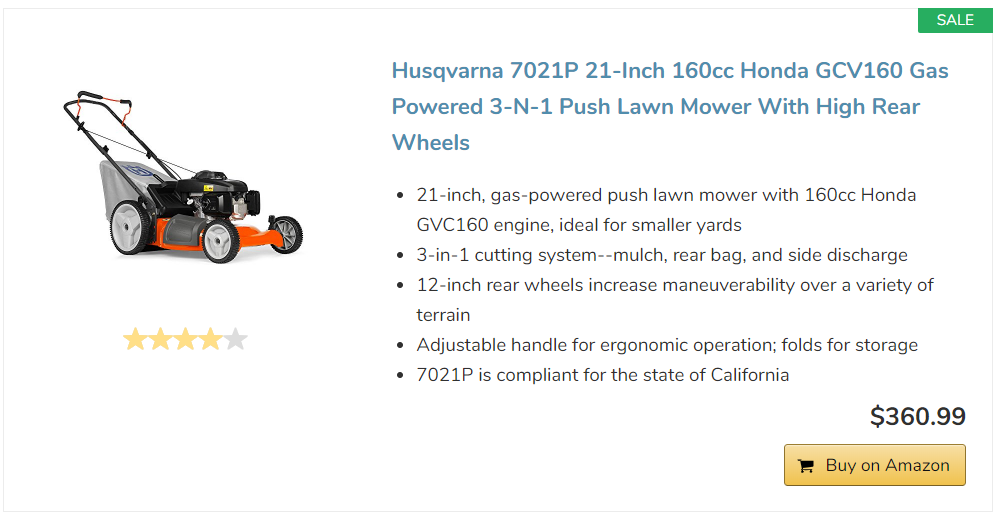
For example, NichePursuits.com/earmuffs, is now my Amazon affiliate link. (Goes to the earmuffs page I was taking screenshots of earlier in this post).

Frequently Asked Questions

Still have questions about the Amazon Associates affiliate program? These are the most common ones.

What Does Adding To Cart Do For The Amazon Affiliate Program?

Adding a product from the Amazon marketplace to your user’s cart will give you an extra 89 days on your cookie length.

This means that if a customer buys your product within 90 days, you get the commission on it.

Some users do this to offset Amazon’s affiliate program short cookie policy.

Most Amazon cookies last just 24 hours. If your user doesn’t buy within a day after clicking your affiliate product link, you end up with nothing.

If you add a product to your visitor’s cart though, you get 90 days instead of just one. This could be a little bit invasive, but it’s worth trying out on your site.

You will need a plugin to do this. I recommend Amalinks Pro or AAWP.

How Do I Insert Amazon Affiliate Links Into WordPress?

That’s what this whole post is about 🙂

If you want to add a link, you can highlight text and click Ctrl + K on Windows or Cmd + K on a Mac.

This brings up the option to add a link.

This method doesn’t require any special plugins, just Sitestripe.

Do I Need An Amazon Affiliate Link Checker?

You might.

If so, I recommend Genius. They can help you know which products you’ve linked to are out of stock.

Conclusion

If you’re getting started using the Amazon Associate program, hopefully some of these tips I’ve shared about how to use Amazon affiliate links will be useful to you.

Amazon provides lots of different options for inserting links into your site that can help you be a successful Amazon seller.

However, I suggest using tools like Amalinks Pro, AAWP, EasyAzon, GeniusLink, or even Table Labs to help you effectively add links to your site.

These plugins and tools allow me to get things done a little bit quicker and provides some advanced options that I may not be able to accomplish otherwise.