Here are the 4 different ways to get the old classic context (Right-click) menu of Windows back on your Windows 11 PC.
Windows 11 brings a brand new user interface with more focus on simplification. It provides a clean and fresh design yet familiar. Windows 11 is built from the ground up to be more user-friendly and touch-friendly. The most significant changes are visible in the Start menu, Context menus, Taskbar, Settings, and the File Explorer.
One of the most subtle Windows 11 changes involves the new modern right-click or context menu for File Explorer and Desktop. The new minimalized context menu is designed to be more simple, touch-friendly, and prevent third-party applications from cluttering the menu with more options. It is still packed with the most frequently used options like Cut, Copy, Rename, Sort, Properties, and Delete.
Users can still access the legacy or classic context menu by clicking on the ‘Show more options’ option on the right-click menu.
Although the new context or right-click menu is simpler and cleaner, it is a bit confusing for a lot of users. Also, the basic options like copy, cut, rename and delete are now only icons, which makes it a bit difficult for average users to navigate. Fortunately, there’s are four different easy ways to disable the new context menu and get back to the old classic context menu of Windows 10 in Windows 11. We will see them all one by one.
Accessing the Classic (Old) Context Menu on Windows 11
Windows 11 is backward compatible. It means Windows 11 is not doing away with the classic or the context menu, you can still revert to the classic context menu if you want.
The easiest way to access the old right-click menu is to right-click anywhere on the File Explorer and select ‘Show more options’.

Alternatively, you can simply press Shift+F10 on your keyboard with a selected file or location.
And you will see the old right-click menu:

Restore the Old Context (Right-Click) Menu via Registry Editor in Windows 11
There is no direct setting that you can use to get back the old Windows 10 context menu on Windows 11. Instead, you have to tweak the registry editor a little bit to restore the classic context menu. Follow these steps exactly to do so:
First, Backup your Windows Registry
Before you make changes to Windows Registry, you should back up your registry as a precaution. In case you accidentally change or delete some important registry entries, you can always restore them with the backup. Although it is not necessary for the restoring context menu, it is always recommended to back up your registry before modifying it.
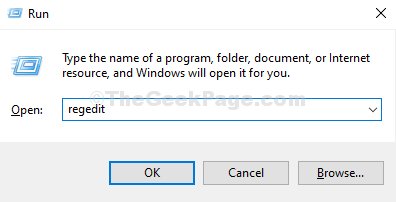
First, open the Windows ‘Registry Editor’ by searching for the ‘Registry Editor’ in the Windows Search and selecting the top result.

Or, press Win+R, enter ‘regedit’ in the Run command and hit Enter.

Then, click ‘Yes’ if asked for permission by User Account Control.

Once registry editor opens, right-click on ‘Computer’ in the left panel and select ‘Export’.

Select the desired location where you wish to store your backup, type a name for the backup file and make sure the ‘All’ option is selected under the Export range at the bottom left corner. Then, click ‘Save’ to save the backup file.

To restore the registry with the backup, either double-click the backup registry file or select the ‘File’ menu in the Registry Editor, click ‘Import’, and select the file from where you saved it.

Enable the Old Right-Click Menu via Registry Editor
In the Registry Editor, navigate to the following folder:
HKEY_CURRENT_USER\SOFTWARE\CLASSES\CLSIDOr you can simply copy and paste the above folder path in the address bar of the Registry Editor and press Enter.

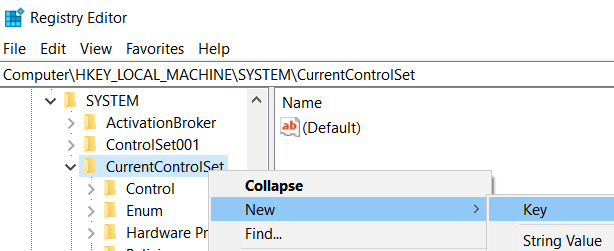
Next, right-click the ‘CLSID’ folder, click ‘New’ and select ‘Key’. Or with the ‘CLSID’ folder selected, right-click an empty space in the right pane and select ‘New > Key’.

A new key (folder) will be generated under the CLSID folder.

Now, rename the key to the following:
{86ca1aa0-34aa-4e8b-a509-50c905bae2a2}Or copy-paste the above line as the key name.

Next, right-click on the newly created key, again click ‘New’, and select ‘Key’ to create a sub-key.

Now, name this new subkey as InprocServer32.

Then, you’ll see a registry key named ‘Default’ inside the InprocServer32 key. Double-click on that ‘Default’ registry in the right pane to open it.

In the Edit String dialog box, make sure the ‘Value data’ field is blank and click ‘OK’ or press Enter. Remember the value field must be left empty not 0.

Then, close the Registry Editor and restart your computer. Or you can restart Windows Explorer from Task Manager instead. After that, right-click on the File Explorer or on the desktop to see the classic right-click menu.

If you want to bring back the new Windows 11 context menu, all you have to do is delete the new Registry key and restart your computer.
To do this, find the newly created key i.e. {86ca1aa0-34aa-4e8b-a509-50c905bae2a2} by navigating to the same location:
HKEY_CURRENT_USER\SOFTWARE\CLASSES\CLSIDThen, right-click the key and select ‘Delete’ to delete it and reboot the system.

This will restore Windows 11’s default context menu on your system.
Restore the Classic Context Menu using Command Prompt
If you’re a command-line user, you can also use Command Prompt to restore the classic context (right-click) menu. Instead of navigating and editing the registry editor yourself, you can use the command lines to quickly edit the registry editor and restore the old right-click menu. Here’s how you do this:
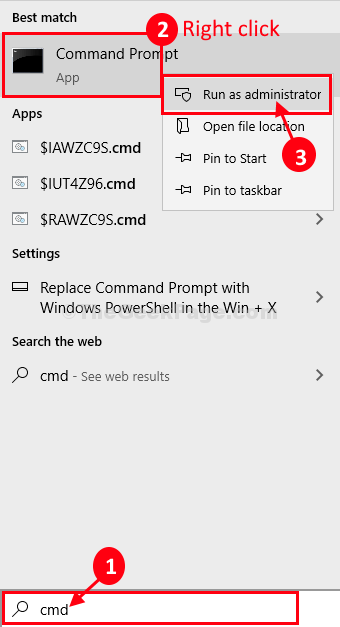
First, click on the Start Menu and search for ‘ Cmd’ or ‘Command Prompt’ and select ‘Run as Administrator’ under Command Prompt.

To get back old classic context menu, run the following command in the CMD and press Enter:
reg.exe add “HKCU\Software\Classes\CLSID\{86ca1aa0-34aa-4e8b-a509-50c905bae2a2}\InprocServer32” /f
This will bring back the old right-click menu for both desktop and File Explorer.

To restore Windows 11’s default (new) context menu, enter the following command:
reg.exe delete “HKCU\Software\Classes\CLSID\{86ca1aa0-34aa-4e8b-a509-50c905bae2a2}” /f
Switch Context Menus using Registry Files
The new Windows 11’s context menu is designed to be simple and touch-friendly. If you are connected one PC to multiple displays, one is a normal display while the other is a touch screen display, you may like to switch between the old context menu and the new context menu often.
In such cases, you don’t need to navigate and edit the Registry editor every time you want to change between old and new context menus. You can create two simple registry files with specific script commands and run that file with a double-click every time you want to change the context menu.
When you execute these registry files, it automatically edits the necessary registry entries to change the right-click menu. Here’s how you create these registry files:
Get the Windows 10 Context Menu Back on Windows 11 using a Registry file
First, let’s create a registry file to bring back the old context menu:
To start with, you have to create a new text document. To do that, right-click on the desktop or the file explorer, select ‘New item’ from the context menu, and then choose ‘Text Document’. You can create a text document in any text editor of your choice.

Name the document with anything you want to call it. For example, we are naming this document ‘Classic context’.

Next, open the newly created text document, copy and paste the whole following code in there as shown below:
Windows Registry Editor Version 5.00
[HKEY_CURRENT_USER\Software\Classes\CLSID\{86ca1aa0-34aa-4e8b-a509-50c905bae2a2}]
@=""
[HKEY_CURRENT_USER\Software\Classes\CLSID\{86ca1aa0-34aa-4e8b-a509-50c905bae2a2}\InprocServer32]
@=""
Then, click the ‘File’ menu and select ‘Save As..’ to change the file type.

Then, click the ‘Save as type:’ drop-down and select ‘All Files (*.*)’.

Now, change the file extension ‘.txt’ to ‘.reg’ at the end of the file name and click the ‘Save’ button.

Alternatively, you can save the file as a text document, and then change the file type to ‘.reg’. To do that, right-click the file, click the ‘Rename’ button, or press F2 to rename the file.

Now, delete ‘.txt’ and change the file extension to ‘.reg’ as shown below and press Enter to apply.

Note: If you are not able to change the file extension, it’s because you’re only editing the file name and the file extension is hidden. The file extensions for known file types are hidden by default. To unhide the file extension so you can change it, go to the ‘Folder Options’ in the File Explorer and deselect the ‘Hide extensions for known file types’ option in the Advanced settings.

Now, try to change the extension, it will change. Also when changing the file extension, Windows will warn you whether you want to change the file type or not, click ‘Yes’.

Now, you got yourself a registry file.

Then, double-click or press Enter on the newly created registry file. Click ‘Yes’ if asked for permission by User Account Control.

Again you will get another warning asking, do you really want to add this third party registry file to your Windows registry. Click ‘Yes’ again.

After that, you’ll get a message box saying that the keys and values contained in the registry file are successfully added to the registry. Click ‘OK’ to complete.

Once you do the above steps, you will notice you have your old classic context menu. If it doesn’t work, restart the File Explorer or the PC for changes to take effect.

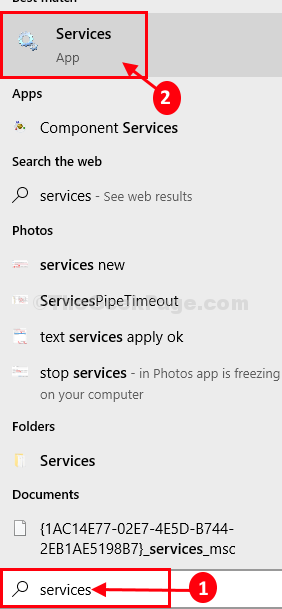
If you want to restart the Windows Explorer to apply changes, then follow these steps: First, open Windows Task Manager by right-clicking the ‘Start’ button and selecting ‘Task Manager.

In the Task Manager, go to the ‘Processes’ tab and find ‘Windows Explorer’ from the list of processes. Then, select it and click ‘Restart’ at the bottom.

This will restart the Windows File Explorer and apply the context menu changes.
Restore the Default (new) Windows 11 Context Menu using a Registry file
We created a registry file to get back the old Context menu, now, let’s create another one to revert to the new default Windows 11 context menu.
You can follow the same instructions we showed in the above section to create this registry file. Create another text document by right-clicking on the desktop or the file explorer, selecting ‘New item’ from the context menu, and choosing ‘Text Document’.
Then, open the newly created text document, copy and paste this code in the newly created document and save the document:
Windows Registry Editor Version 5.00
[-HKEY_CURRENT_USER\Software\Classes\CLSID\{86ca1aa0-34aa-4e8b-a509-50c905bae2a2}]

Next, rename the file with a different name so you can recognize between the two registry files and change its extension to ‘.reg’. Here, we’re renaming the file to ‘New Context.reg’.

Click ‘Yes’ to the Rename confirmation box.

Now, you got two registry files: ‘Classic context.reg’ for the old Windows 10 context menu and ‘New Context.reg’ for the default Windows 11 context menu.

Run the ‘New Context.reg’ by double-clicking the file and clicking ‘Yes’ to both UAC and Registry Editor confirmation box to restore the new Windows 11 right-click menu.

Now, you can easily switch between the context menus by simply running the respective registry files.
If you want, you can simply download the registry files contained in the ‘.zip’ file linked below.
When you extract the file, you’ll find two registry files for changing context menus. You can run the desired file to enable or disable the classic context menu.
Revert to the Old Context Menu in Windows 11 using a Third-Party app
You can also use a third-party program to bring back the old context menu on Windows 11. Winaero Tweaker is a free Windows customization and tweaker tool that enables you to modify the hidden settings that Windows does not allow you to change from the user interface. It is a custom-built utility that is safe to use and it’s free of ads, scripts, and web tracking. It can also be used to bring back (revert) the old context menu in Windows 11. Here’s how you do this:
First, visit the official website and download the Winaero Tweaker for free. Once the download is complete, extract the downloaded ZIP file and run the EXE file to install the program.

While installing the app, you can choose whether you want to install it in normal mode or portable mode (so you can take the extracted software with you when you move to another computer).

After completing the installation, launch the Winaero Tweaker app.
Then, head over to the ‘Windows 11’ Section in the left pane and click on the ‘Classic Full Context Menus’ option.

Now, check the box for ‘Enable classic full context menus’ in the right pane.

Once you do that, you will see a ‘Restart Explorer’ button at the bottom. Click on it to restart the file explorer.

Once the File Explorer restarts, you should have the classic full context menu on your Windows 11 PC.

If you want to revert back to the default Windows 11 context menu, simply uncheck the ‘Enable classic full context menus’ option or click the ‘Reset this page to defaults’ button at the top. Then, click ‘Restart Explorer’ at the bottom for changes to take effect.

That’s it.


 F
F